Spring Boot + MySQLで CRUD RESTfulなエンドポイントを実装する方法
Spring Boot と MySQLを使用して CRUD(Create, Read, Update, Delete)機能をもつRESTfulなエンドポイントの実装を練習したときのメモです。
ブラウザからエンドポイントを利用してデータを操作するところまで実践しながら学びました。
開発環境にEclipseを使いました。
前提
・Eclipse はインストール済みであること。
Java 学習メモ 【環境構築編】2022 年 12 月版 Eclipse のインストール方法
・STS(Spring Tool Suite4)はダウンロードしてインストール済みであること。
・MySQL はインストール済みであること。
プロジェクトの構成
Eclipse(Eclipse IDE for Enterprise Java and Web Developers)
Spring Boot Webアプリケーションフレームワーク
Maven ビルドツール
MySQLデータベース
最終的なディレクトリ/ファイル構成
- src
  |- main
     |- java
        |- com.sample
          |- model
                └ User.java
          |- repository
                └ UserRepository.java
          |- controller
                └ UserController.java
          |- service
                └ UserService.java
     |- resources
        |- application.properties
        |- templates
        |- static
                |- create.html
                |- read.html
                |- update.html
                └  delete.html
Spring Boot プロジェクトの作成
STS を起動し、新しい Spring Boot プロジェクトを作成します。Spring Initializr を使用して、必要な依存関係を含むプロジェクトを作成します。
Eclipse のメニューから「File」→「New」→「Other」→「Spring Boot」→「Spring Starter Project」を選択します。
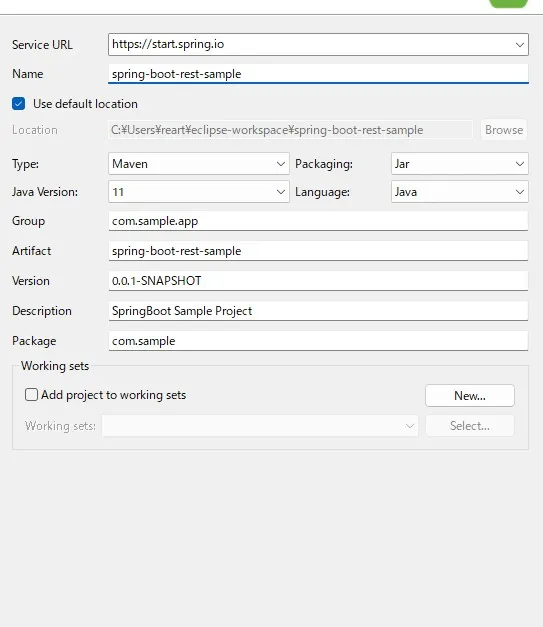
依存関係
WEB - Spring Web
SQL - Spring Data JPA, MySQL Driver

MySQL データベースのセットアップ
データベースを作成します。
create database sampledb;
use sampledb;
テーブルを作成します。
| カラム名 | データ型 | 制約 |
|---|---|---|
| id | INT | PRIMARY KEY |
| name | VARCHAR(100) | NOT NULL |
| VARCHAR(100) | NOT NULL | |
| age | INT | |
| address | VARCHAR(200) |
CREATE TABLE users (
    id INT PRIMARY KEY AUTO_INCREMENT,
    name VARCHAR(100) NOT NULL,
    email VARCHAR(100) NOT NULL,
    age INT,
    address VARCHAR(200)
);
サンプルデータを作成します。
INSERT INTO users (name, email, age, address)
VALUES
    ('John Doe', '[email protected]', 30, '123 Main Street'),
    ('Jane Smith', '[email protected]', 25, '456 Elm Avenue'),
    ('Mike Johnson', '[email protected]', 40, '789 Oak Road');
データモデルを作成
MySQLのテーブルとマッピングするエンティティクラスを作成します。JPAアノテーションを使用して、エンティティクラスをデータベーステーブルにマッピングします。
com.sample.modelパッケージを作成してその下にUser.javaクラスを作成します。
- src
  |- main
     |- java
        |- com.sample
          |- model    <-- 新しく作成するパッケージ
                └ User.java    <-- 新しく作成するクラス
     |- resources
        |- application.properties
        |- templates
        |- static
User.java
※バージョンによってはjakartaがjavaxの場合がありますので注意!
import jakarta.persistence.*;

@Entity
@Table(name = "users")
public class User {

    @Id
    @GeneratedValue(strategy = GenerationType.IDENTITY)
    private Long id;

    @Column(name = "name", nullable = false)
    private String name;

    @Column(name = "email", nullable = false)
    private String email;

    @Column(name = "age")
    private Integer age;

    @Column(name = "address")
    private String address;

    // Getter and Setter methods

    public Long getId() {
        return id;
    }

    public void setId(Long id) {
        this.id = id;
    }

    public String getName() {
        return name;
    }

    public void setName(String name) {
        this.name = name;
    }

    public String getEmail() {
        return email;
    }

    public void setEmail(String email) {
        this.email = email;
    }

    public Integer getAge() {
        return age;
    }

    public void setAge(Integer age) {
        this.age = age;
    }

    public String getAddress() {
        return address;
    }

    public void setAddress(String address) {
        this.address = address;
    }
}
データベース接続の設定
application.propertiesを使用して、MySQLデータベースの接続情報を設定します。
- src
  |- main
     |- java
        |- com.sample
          |- model
     |- resources
        |- application.properties    <-- これ
        |- templates
        |- static
# MySQLデータベース接続設定
spring.datasource.url=jdbc:mysql://localhost:3306/sample?useSSL=false
spring.datasource.username=your_mysql_username
spring.datasource.password=your_mysql_password

# JPA設定
spring.jpa.hibernate.ddl-auto=create
リポジトリの作成
Spring Data JPAを使用して、データベースへのアクセスを行うためのリポジトリクラスを作成します
- src
  |- main
     |- java
        |- com.sample
          |- model
          |- repository    <-- 新しく作成するパッケージ
                └ UserRepository.java    <-- 新しく作成するクラス
     |- resources
        |- application.properties
        |- templates
        |- static
UserRepository.java
package com.sample.repository;

import jakarta.persistence.*;
import org.springframework.data.jpa.repository.JpaRepository;
import org.springframework.stereotype.Repository;
import com.sample.model.User;

@Repository
public interface UserRepository extends JpaRepository<User, Long> {
    // 任意のカスタムクエリやメソッドを定義することができます
}
コントローラーとサービスの実装
エンティティに対するCRUD操作を実行するためのコントローラーとサービスクラスを作成します。
コントローラークラスがエンドポイントを定義し、HTTPリクエストを受け取って対応するサービスメソッドを呼び出します。
サービスクラスはデータベースに対するCRUD操作を提供し、UserRepositoryを使用してデータベースにアクセスします。
- src
  |- main
     |- java
        |- com.sample
          |- model
          |- repository
          |- controller    <-- 新しく作成するパッケージ
                └ UserController.java    <-- 新しく作成するクラス
          |- service       <-- 新しく作成するパッケージ
                └ UserService.java    <-- 新しく作成するクラス
     |- resources
        |- application.properties
        |- templates
        |- static
UserController(コントローラークラス)の実装例
package com.sample.controller;

import org.springframework.beans.factory.annotation.Autowired;
import org.springframework.web.bind.annotation.*;
import com.sample.model.User;
import com.sample.service.UserService;

@RestController
@RequestMapping("/users")
public class UserController {

    @Autowired
    private UserService userService;

    @GetMapping("/{id}")
    public User getUser(@PathVariable Long id) {
        return userService.getUserById(id);
    }

    @PostMapping
    public User createUser(@RequestBody User user) {
        return userService.saveUser(user);
    }

    @PutMapping("/{id}")
    public User updateUser(@PathVariable Long id, @RequestBody User user) {
        return userService.updateUser(id, user);
    }

    @DeleteMapping("/{id}")
    public void deleteUser(@PathVariable Long id) {
        userService.deleteUser(id);
    }
}
UserService(サービスクラス)の実装例
package com.sample.service;

import org.springframework.beans.factory.annotation.Autowired;
import org.springframework.stereotype.Service;
import com.sample.model.User;
import com.sample.repository.UserRepository;

@Service
public class UserService {

    @Autowired
    private UserRepository userRepository;

    public User getUserById(Long id) {
        return userRepository.findById(id).orElse(null);
    }

    public User saveUser(User user) {
        return userRepository.save(user);
    }

    public User updateUser(Long id, User user) {
        user.setId(id);
        return userRepository.save(user);
    }

    public void deleteUser(Long id) {
        userRepository.deleteById(id);
    }
}
これでエンドポイントは完成です。
実際にフロントエンドからJavaScriptでエンドポイントを利用してデータの操作
Project Explorerでプロジェクトを右クリック「Run As」→「Spring Boot App」を選択します。
HTMLファイルを今回は分かりやすくcreate.html,read.html,update.html,delete.htmlに分けて作成します。
- src
  |- main
     |- java
        |- com.sample
          |- model
          |- repository
          |- controller
          |- service
     |- resources
        |- application.properties
        |- templates
        |- static
                |- create.html    <-- 新しく作成するファイル
                |- read.html      <-- 新しく作成するファイル
                |- update.html    <-- 新しく作成するファイル
                |- delete.html    <-- 新しく作成するファイル
Create
CRUDのCreate(作成操作)
ユーザーを新しく作成します。
HTTPメソッドとしてPOSTを使用し、情報をサーバーに提供して登録処理を行います。
POSTメソッドでリクエストを受け取るとコントローラーの@PostMappingのところの処理が動いてユーザーを新しく作成することができます。
UserController.java
@PostMapping
public User createUser(@RequestBody User user) {
    return userService.saveUser(user);
}
ページを読み込むとFetch APIでPOSTリクエストします。
create.html
<!DOCTYPE html>
<html>
  <head>
    <title>Create User</title>
  </head>
  <body>
    <h1>Create User</h1>
    <script>
      window.onload = (event) => {
          const postData = {
          name: "Devil devio",
          email: "[email protected]",
          age: 30,
          address: "Miyagi Sendai"
          };
          const requestOptions = {
                  method: 'POST',
                  headers: {
                      'Content-Type': 'application/json'
                  },
                  body: JSON.stringify(postData)
                  };

          fetch('http://localhost:8080/users', requestOptions)
          .then(response => response.json())
          .then(data => {
              console.log('Response:', data);
          })
          .catch(error => console.error('Error:', error));
      };
    </script>
  </body>
</html>
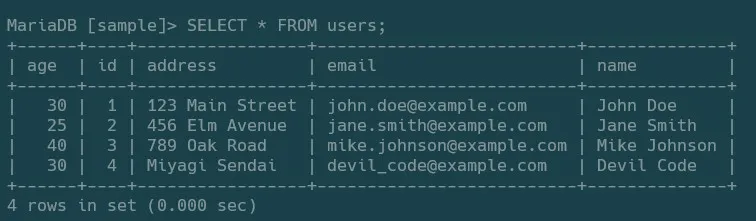
試しにSQLで確認してみると4のidで正しく登録されてることが分かります。
Read
次はCRUD
READ(読み込み操作)ですので今度はFetch APIでGETリクエストを行い、ユーザーの情報を取ってきます。
GETメソッドでリクエストを受け取るとコントローラーの@GetMappingのところの処理が動いてユーザーデータを参照することができます。
エンドポイントの形式はhttp://localhost:8080/users/{id}です。せっかくですのでidの部分には先ほど登録したデータのidである4を指定します。
UserController.java
@PostMapping
public User createUser(@RequestBody User user) {
    return userService.saveUser(user);
}
create.html
<!DOCTYPE html>
<html>
  <head>
    <title>User List</title>
  </head>
  <body>
    <h1>User List</h1>
    <table>
      <tr id="th"></tr>
      <tr id="td"></tr>
    </table>
    <script>
      window.onload = (event) => {
        fetch('http://localhost:8080/users/4')
			.then(response => response.json())
			.then(data => {
			    const th = document.getElementById('th');
			    const td = document.getElementById('td');

			    for (var key in data) {
			    	th.insertAdjacentHTML('beforeend', `<th>${key}</th>`);
			    	td.insertAdjacentHTML('beforeend', `<th>${data[key]}</th>`);
			    }
			})
			.catch(error => console.error('Error:', error));
      };
    </script>
  </body>
</html>
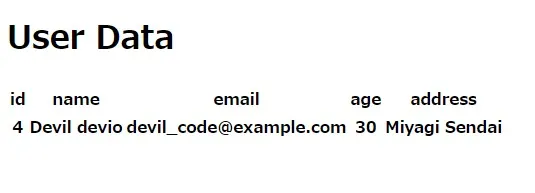
先ほど登録したデータが画面上で確認することができました。
http://localhost:8080/users/1 や http://localhost:8080/users/2 とすれば別なユーザーのデータを参照することができます。
UPDATE
次はCRUD
UPDATE(更新操作)です。
今度はFetch APIでPUTリクエストを行い、ユーザーの情報を更新します。
PUTメソッドでリクエストを受け取るとコントローラーの@PutMappingのところの処理が動いてユーザーデータを更新することができます。
エンドポイントの形式はREADと同様にhttp://localhost:8080/users/{id}です。idの部分には先ほどと同様に4を指定します。
さきほどは年齢が30でしたが、31に変更したいのでリクエストBODYのageを31とします。
このとき変更したい項目だけ、例えば
const updatedData = {
    age: 31,
};
とすると今回のプログラムは局所的な変更ができず、リクエストBODYに含めなかった項目はNULLになる仕様になってますのでMySQLのNOT NULL制約に引っかかって500エラーとなります。他の項目も一緒にリクエストしましょう。
const updatedData = {
    name: "Devil devio",
    email: "[email protected]",
    age: 31,
    address: "Miyagi Sendai"
    };
update.html
<!DOCTYPE html>
<html>
  <head>
    <title>Update User</title>
  </head>
  <body>
    <h1>Update User</h1>
    <script>
		const updatedData = {
		  name: "Devil devio",
		  email: "[email protected]",
		  age: 31,
		  address: "Miyagi Sendai"
		 };


        const requestOptions = {
        method: 'PUT',
        headers: {
            'Content-Type': 'application/json'
        },
        body: JSON.stringify(updatedData)
        };

        fetch('http://localhost:8080/users/4', requestOptions)
        .then(response => response.json())
        .then(data => {
            console.log('Response:', data);
        })
        .catch(error => console.error('Error:', error));
    </script>
  </body>
</html>

さて、確認してみると正しく31に変更されていますね。
DELETE
最後はCRUD
DELETE(削除操作)です。
Fetch APIでDELETEリクエストを行い、ユーザーの情報を削除します。
PUTメソッドでリクエストを受け取るとコントローラーの@DeleteMappingのところの処理が動いてユーザーデータを削除することができます。
エンドポイントの形式はhttp://localhost:8080/users/{id}です。idの部分にはこれまで同様に4を指定します。
delete.html
<!DOCTYPE html>
<html>
  <head>
    <title>Delete User</title>
  </head>
  <body>
    <h1>Delete User</h1>
    <script>
        const requestOptions = {
        method: 'DELETE',
        };

        fetch('http://localhost:8080/users/4', requestOptions)
        .then(response => {
            if (response.ok) {
            console.log('Data with id 4 deleted successfully.');
            } else {
            console.error('Delete operation failed.');
            }
        })
        .catch(error => console.error('Error:', error));
    </script>
  </body>
</html>
これでデータを削除することができました。
ここまでSpring Boot と MySQLを使用して CRUD(Create, Read, Update, Delete)機能をもつRESTfulなエンドポイントのサンプルを実装しました。
今回は練習用ですので省きましたが、RESTfulなアプリケーションを本番環境で展開する際には、セキュリティ対策が非常に重要であるようです。
プロトコルや認証と認可、CSRF対策、SQLインジェクション対策、入力検証、セッション管理、アクセス制御、ロギングなどについても今後学んでいければいいなと思いました。